Multi-OS-Engine – MOE for short – is an open source framework, which enables you to write iOS and Android application in Java. The most interesting thing is that created apps are compiled to native code and they use common code in Java. It’s saves a lot of time and it’s good idea for Android Developers, who want to have iOS app also. MOE was acquired by Intel in 2015. It’s got good community support and it develops fast. About a month ago new MOE version 1.3 was released. It brings a lot of changes. Unfortunately, existing tutorials hasn’t been updated yet, so we decide to write a series of tutorials, which show step by step, how to create simple MOE app.
In this tutorial we will show you how to create MOE application, which fetches GitHub repositories list from here and show them in RecyclerView on Android and UITableView on iOS app. It’s quite long, but it describes step by step how to create whole application including iOS views in Xcode. It takes about 30 minute to read it all. If you don’t have experience with MOE and Xcode, you will need about 2 hours to implement it. Article consist of 4 main parts. First of them shows how to create MOE project with Android Studio. The second part is focused on main application logic, it shows how to connect Retrofit and RxJava to a common module. Third section is the most detailed, it presents how to create iOS views with Storyboard in Xcode. The last one is the shortest, it describes how to connect Android Activity with common module. We also include a table of contents to make the article easier to navigate. This project uses Xcode Version 8.3, Android Studio version 2.3 and MOE SDK version > 1.3.2.
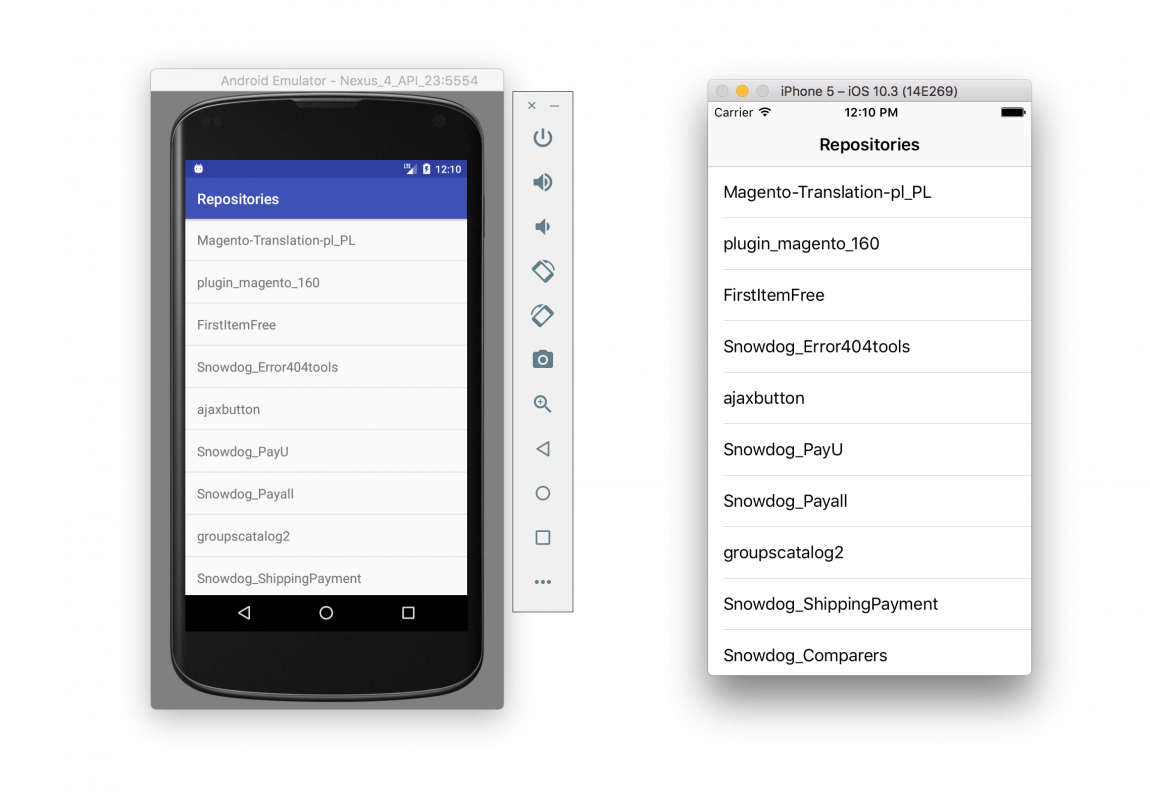
The source code is available on our GitHub repository MoeAppSample on branch Tutorial_1. Finished app is shown on the screens bellow:

Contents
- Set up environment
- Create project and set dependencies
- Write shared part
- Create iOS Views
- Create Android Views
- Summary
- Other external links
Set up environment
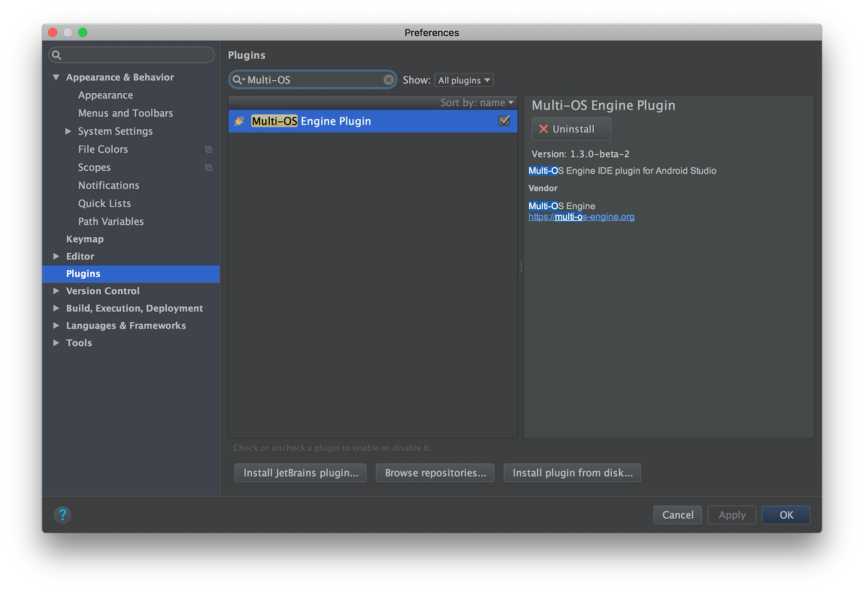
Before you start working on MOE application you should check prerequisites. You can find them in documentation. Next you need to add MOE plugin to Android Studio. Go to Android Studio → Preferences → Plugins and type Multi-OS and install them.
After installation you are ready to start writing your first MOE application.
Create project and set dependencies
MOE applications should have 3 modules. Two of them consist only views for each platform and one module is shared between views. Android and iOS views cannot see each other. They should have only methods, which are responsible for UI and should be as small as possible. The Model-View-Presenter architectures recommended to write clean code and separate views.
Android module
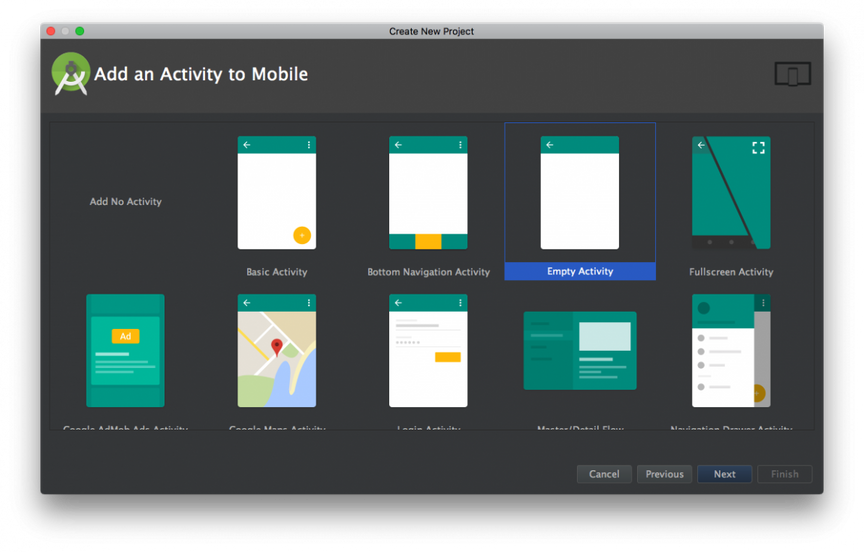
1. First of modules is the app. This is regular Android application. Let’s create it. Open Android studio and create project.

2. Select Empty Activity
Common module
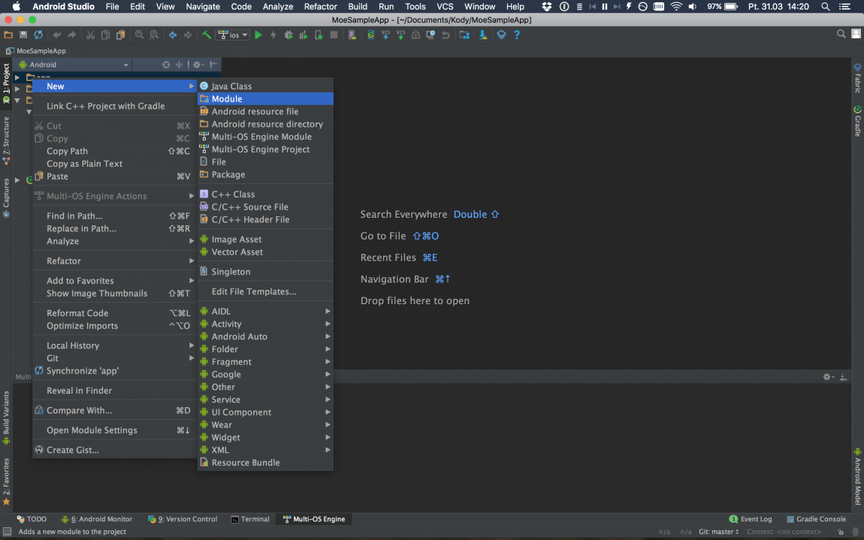
Second module called common contains all application’s logic and it’s shared between Android and iOS modules. Let’s create it. 1. Right click on main project directory and select New → Module
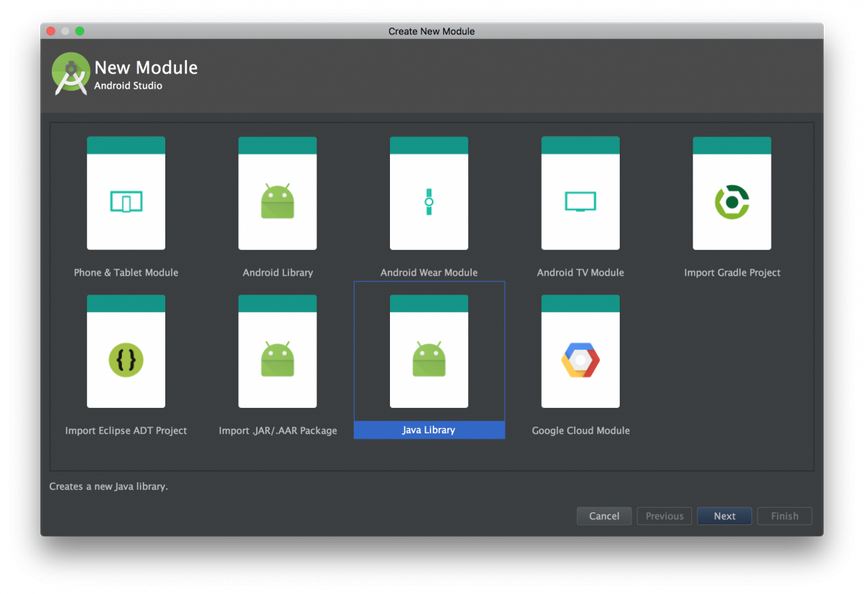
2. Select java library:
3. Change module and package name:

iOS module
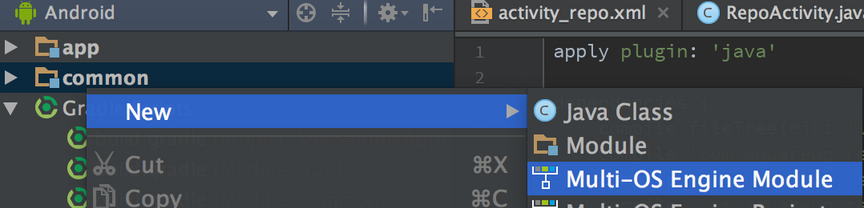
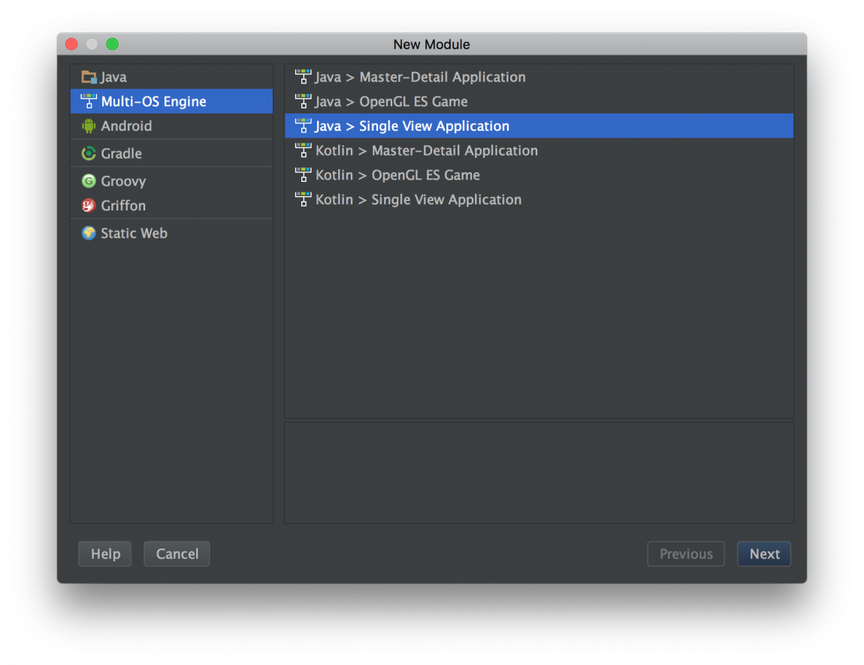
1. The last module called ios contains all ios code written in Java and entire Xcode project. To generate this module, right click on project directory and select New → Multi-OS Engine Module
2. Select Single View Application and click Next
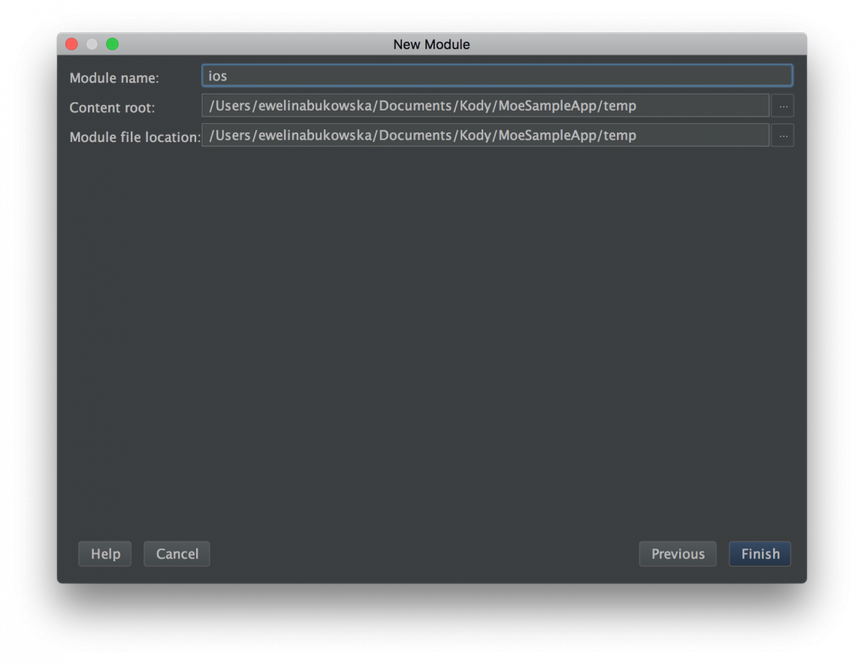
3. Fulfill information required to create Xcode project.

4. Change module name to ios and click Finish
Wait until Android Studio generate module. This may take a while. Don’t interrupt.
Add dependencies
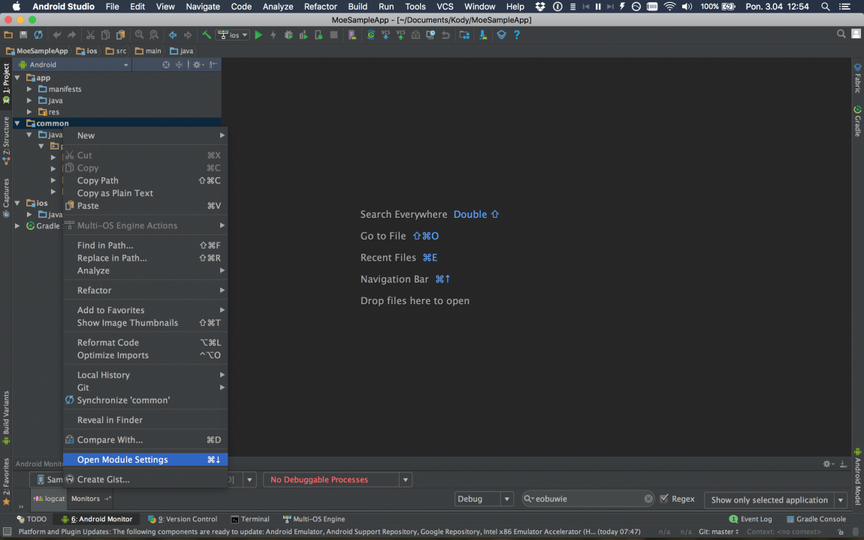
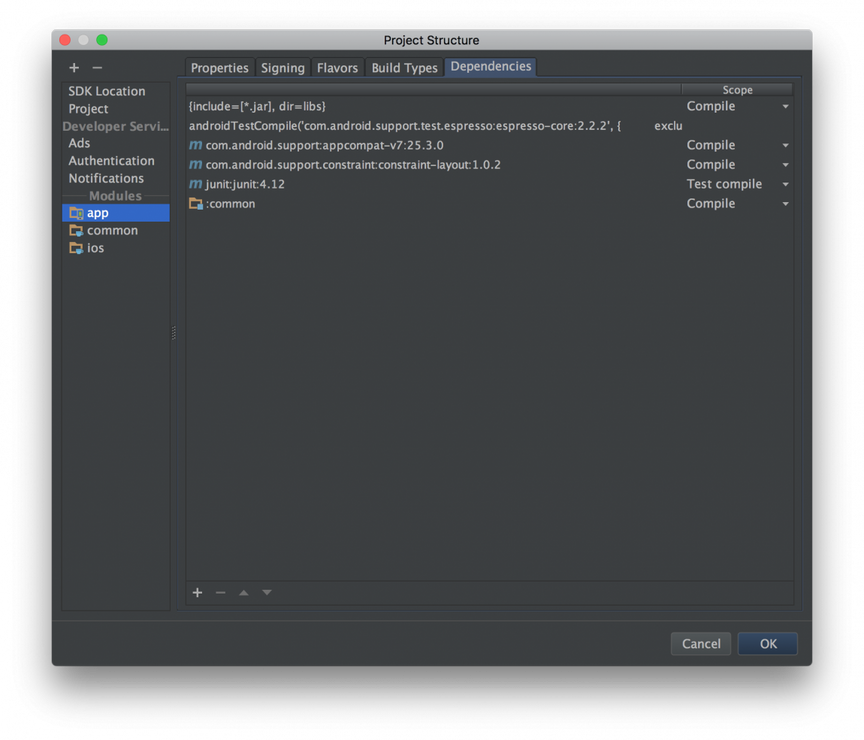
1. We’ve got now 3 independents modules. Our purpose is to enable Android and iOS views to see common module. To do this, right click on common module and select Open Module Settings
2. On the left section select ios, click + on the bottom of window and select 3 Module Dependency
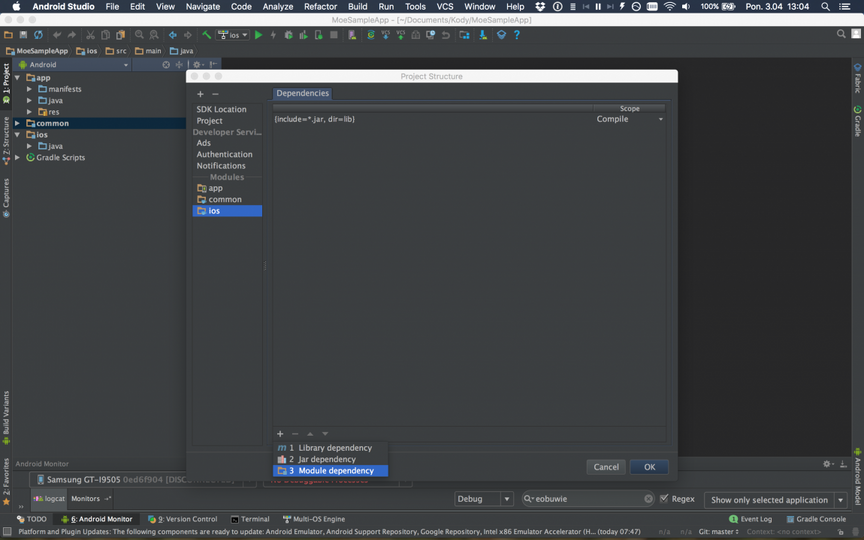
3. Select common and accept. Next select app on the left section and switch tab to Dependency. Click + and add dependency to common module as previously.
Write shared part
We are ready to start writing our application.
1. Add dependencies for RxJava and Retrofit 2 in common module in build.gradle file :
compile 'com.squareup.retrofit2:retrofit:2.1.0'
compile 'com.squareup.retrofit2:converter-gson:2.1.0'
compile 'com.squareup.retrofit2:adapter-rxjava:2.1.0'
compile 'io.reactivex:rxjava:1.1.6'
2. Add dependencies for RxJava Android adapter in app module in build.gradle file:
compile 'io.reactivex:rxandroid:1.2.1'3. Next create model class in common module:
package pl.snowdog.model;

public class Repository {

    private int id;
    private String name;

    public int getId() {
        return id;
    }

    public String getName() {
        return name;
    }
}
4. Add Retrofit interface:
public interface GitHubApi {
    @GET("orgs/SnowdogApps/repos")
    Observable<List<Repository>> getRepos();
}
5. Create Retrofit service generator:
public class ServiceGenerator {

    private static final String BASE_URL = "https://api.github.com/";

    private static Retrofit.Builder builder =
        new Retrofit.Builder()
            .baseUrl(BASE_URL)
            .addConverterFactory(GsonConverterFactory.create())
            .addCallAdapterFactory(RxJavaCallAdapterFactory.create());

    public static <S> S createService(Class<S> serviceClass) {
        Retrofit retrofit = builder.build();
        return retrofit.create(serviceClass);
    }
}
6. Then create presenter which sends request and fetches data from response.
public void getRepositories(Scheduler postThread, Scheduler subscribeThread) {
    GitHubApi gitHubApi = ServiceGenerator.createService(GitHubApi.class);
    gitHubApi.getRepos()
        .subscribeOn(subscribeThread)
        .observeOn(postThread)
        .subscribe(new Subscriber<List<Repository>>() {
            @Override
            public void onCompleted() {
            }

            @Override
            public void onError(Throwable e) {
            }

            @Override
            public void onNext(List<Repository> repositories) {
                mView.showRepositories(repositories);
            }
        });
}
7. Create IRespositoryView – simple interface, which is responsible to send downloaded data to Android and iOS views.
public interface IRepositoryView {
    void showRepositories(List<Repository> allRepositories);
}
Create iOS Views
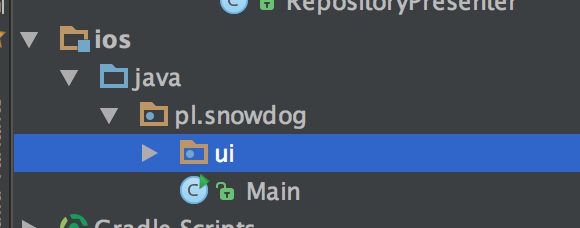
1. Shared Java code of application is ready, so we can start with creating views. First, we need to delete ui package with generated class.
Create views in Xcode
2. To start working with iOS views right click on ios module and select Open project in Xcode If it doesn’t work, make sure that you use at least version 3.3 of Gradle. You can check them in file . It should look like this:
distributionBase=GRADLE_USER_HOME
distributionPath=wrapper/dists
zipStoreBase=GRADLE_USER_HOME
zipStorePath=wrapper/dists
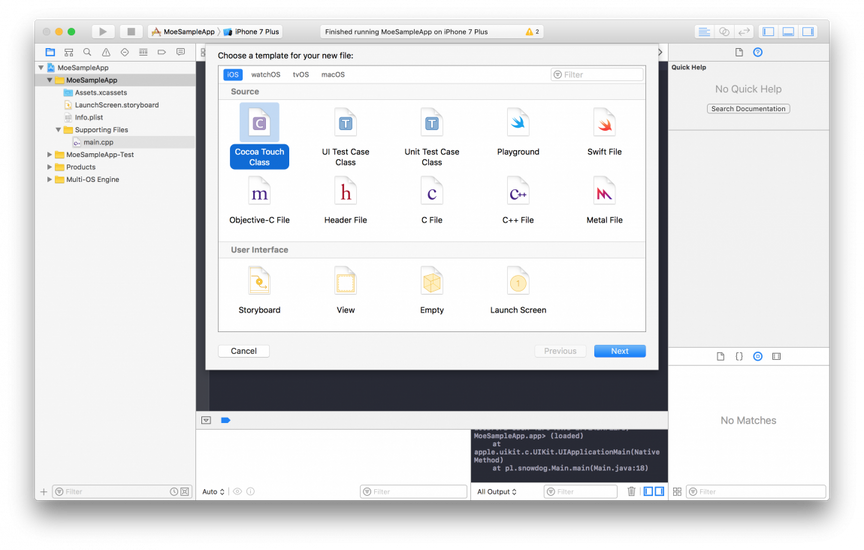
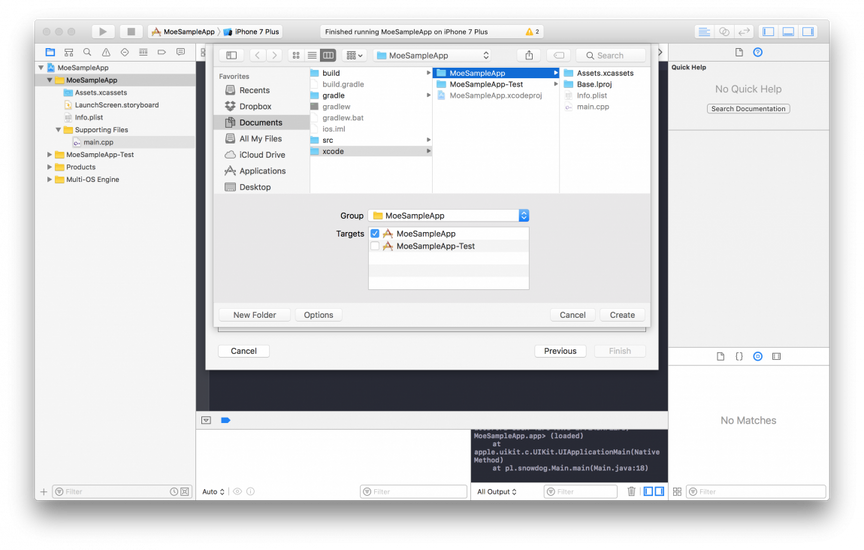
distributionUrl=https\://services.gradle.org/distributions/gradle-3.3-all.zip3. When Xcode will be started click on MoeSampleApp and select New file

4. Select Cocoa Touch Class and click Next
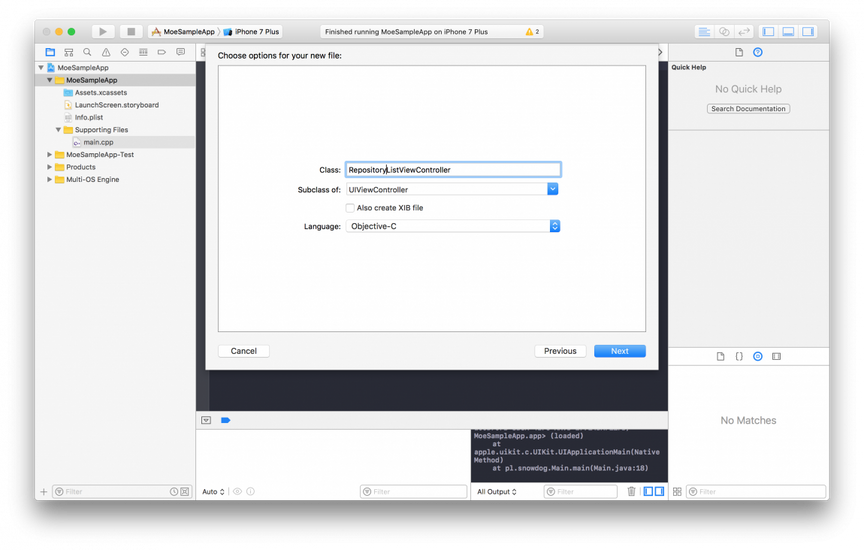
5. Name class RepositoryListViewController, select subclass UIViewController, don’t create XIB file and select Language Objective-C
6. Choose directory /xcode/MoeSampleApp and check target MoeSampleApp and click Create
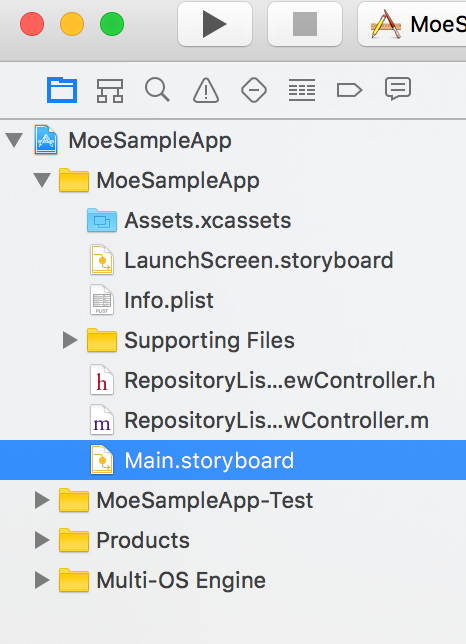
7. Next select Main.storyboard in project files on the left.
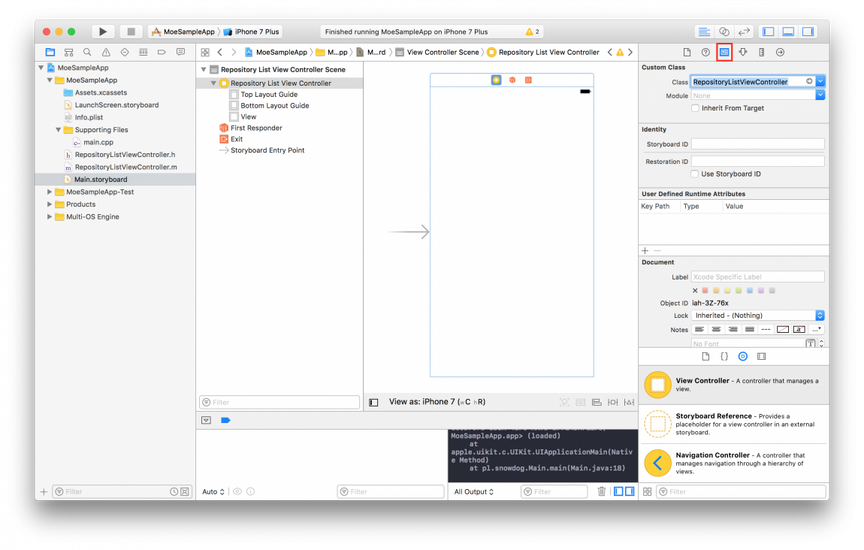
8. Make sure that you have checked appropriate icons (red rectangle the on screen). Next delete existing View Controller and drag and drop new View Controller
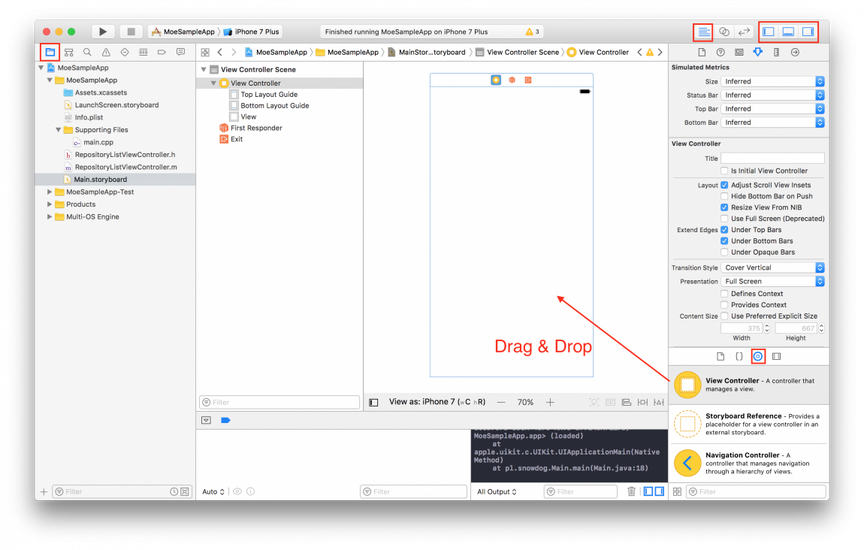
9. On the right panel check Is Initial View Controller
10. Switch icon on right panel (red rectangle), in section Custom Class set class RepositoryListViewController
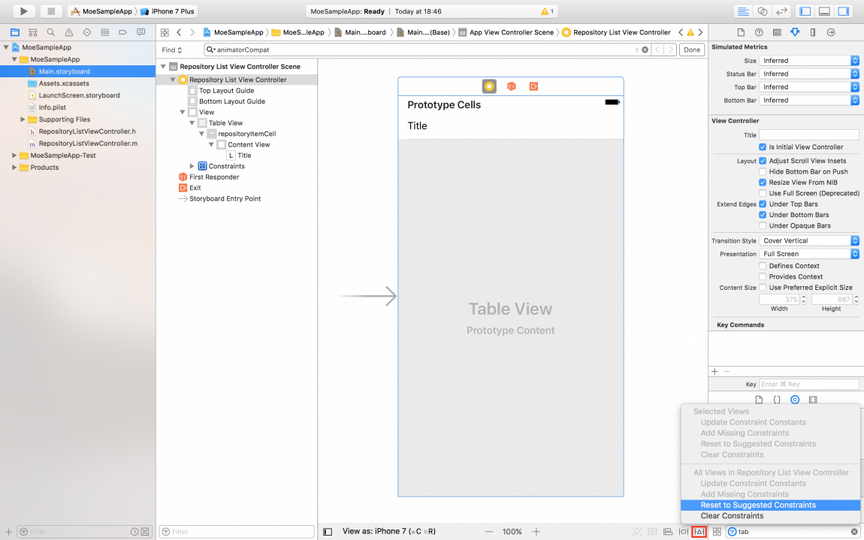
11. Drag and drop table view inside View Controller. Resize Table View to fulfill entire View Controller.

12. Drag and drop Table View Cell inside Table View. Select Table View Cell in Repository List View Controller Scene. On the right panel set identifier to repositoryItemCell and select Basic from Style combobox.

13. Select Repository List View Controller, click Resolve Auto Layout Issues (small icon with triangle inside – red rectangle on the screen ) and click Reset to Suggested Constraint
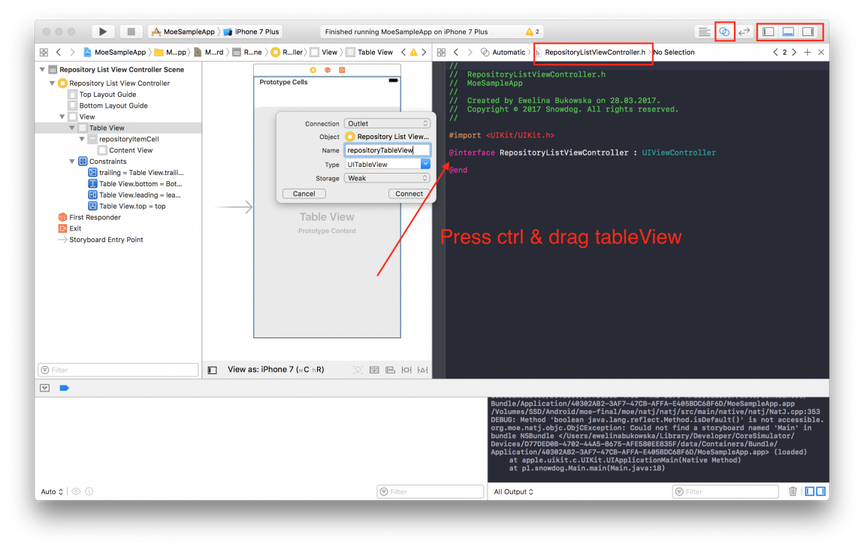
14. Switch to Assistant Editor ( two crossed circles – square on the top right corner), select RepositoryListViewController.h file. Press ctrl and drag tableView between @interface and @end . Name it as repositoryTableView , set connection to Outlet and Type UITableView. Click connect.
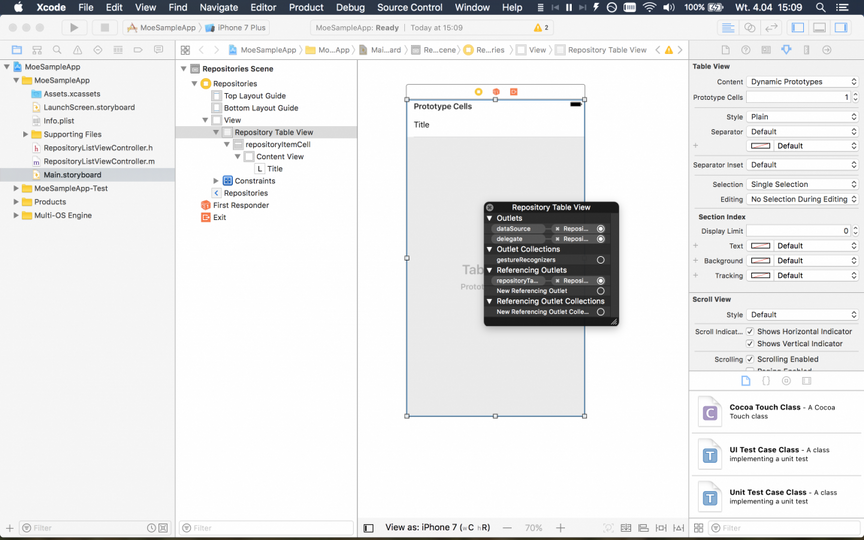
15. Now we have to connect dataSource and delegate to tableView. To do that come back to Standard Editor and in Storyboard press ctrl and drag tableView to yellow circle icon with white squared inside. In Outlets dialog select dataSource and delegate.
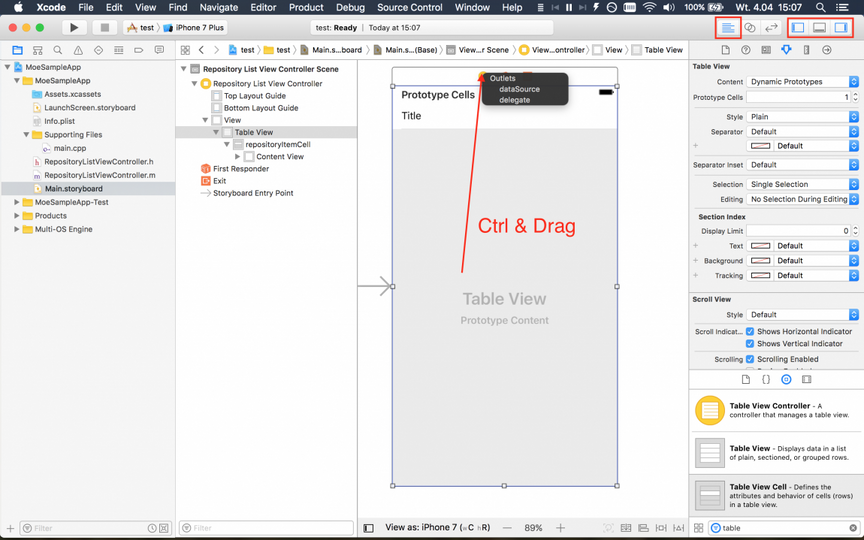
16. To check the connection, right click on Table View in Storyboard. It should look like on the screen.
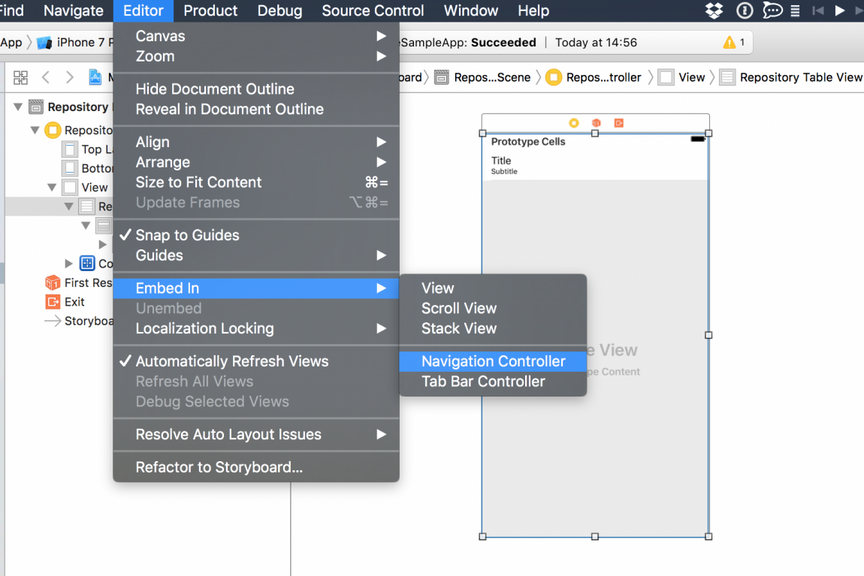
17. Add Navigation View Controller. In Storyboard select on Repository List View Controller. Then in Xcode menu click Editor → Embed In → Navigation Controller
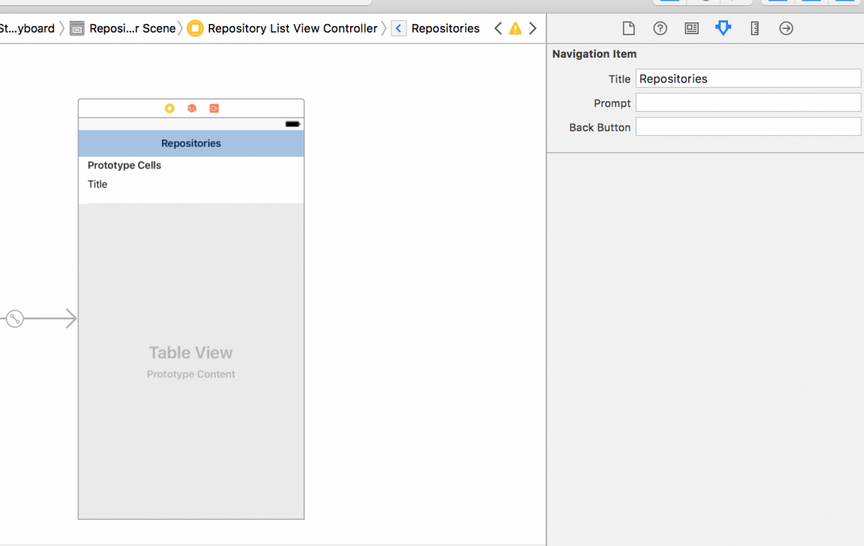
18. Rename title in Navigation Controller. Click on Navigation Item and rename title of it.
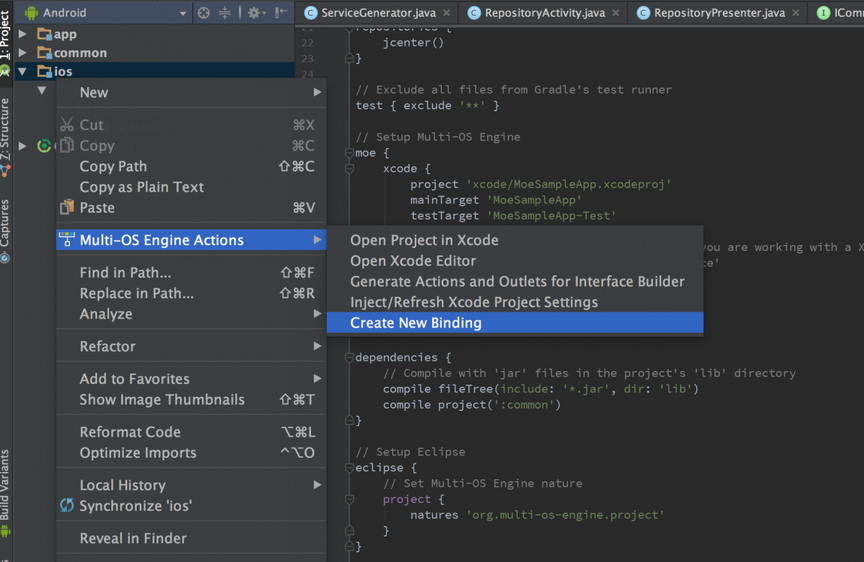
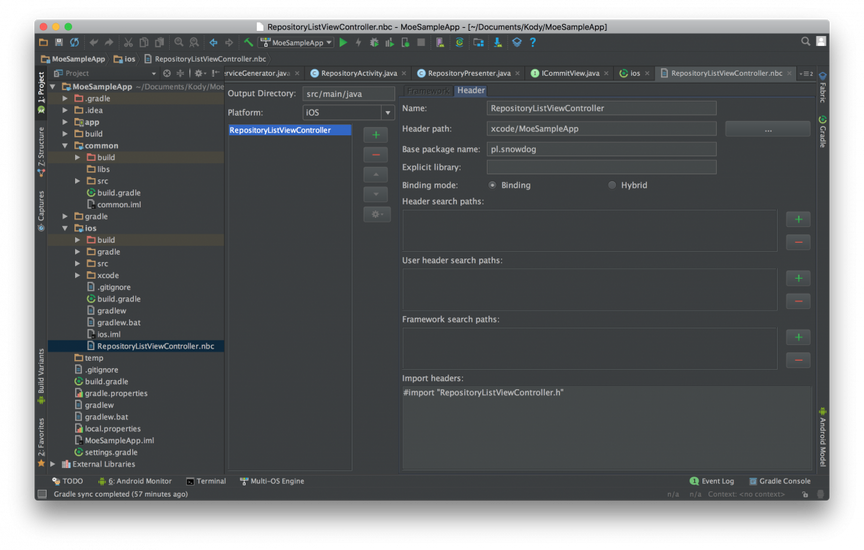
19. Working with Xcode is already finished. Now it is necessary to bind created UI to rest of apps written in Java. To do that open Android Studio. Right click in ios module, select Multi-OS Engine Actions → Create New Binding named nbc file RepositoryListViewController , next select green +, select Header option and named again RepositoryListViewController .
20. Set Header path to xcode/MoeSampleApp , Base package name to your project package, in our sample there is pl.snowdog and in Import headers section write #import "RepositoryListViewController.h"
21. Next click settings icon and choose Generate Bindings
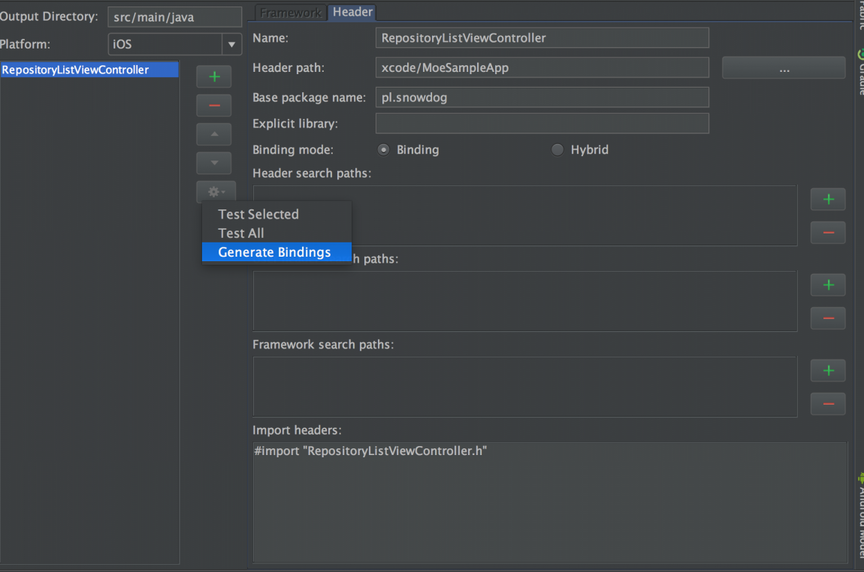
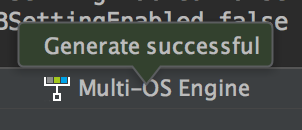
Wait until you see message on the bottom
Write code in Java
Fulfill table view with sample data
Generate binding finished successfully. In ios module in java→{package}→src there is generated file, called RepositoryListViewController.java . Inside them we can see generated native Objective-C methods. Android Studio tagged them as errors, but they are only warnings and might be ignored. Here we will write all Java code responsible for UI behaviors.
1. First of all, it is necessary to add some annotation on the top of class definition:
@Runtime(ObjCRuntime.class)
@ObjCClassName("RepositoryListViewController")
@RegisterOnStartup
Let’s start with fulfilling UITableView with sample data. 2. First implement necessary interfaces. For UITableView there are UITableViewDataSource , UITableViewDelegate.
public class RepositoryListViewController extends UIViewController implements UITableViewDataSource, UITableViewDelegate3. Next override required method and fulfill them with sample data:
@Override
public UITableViewCell tableViewCellForRowAtIndexPath(UITableView tableView, NSIndexPath indexPath) {
    UITableViewCell cell = (UITableViewCell) tableView.dequeueReusableCellWithIdentifierForIndexPath(CELL_IDENTIFIER, indexPath);
    cell.textLabel().setText("Test");
    return cell;
}

@Override
public long tableViewNumberOfRowsInSection(UITableView tableView, @NInt long section) {
    return 5;
}
4. CELL_IDENTIFIER is constant. It’s value must be the same as cell identifier set in Xcode.
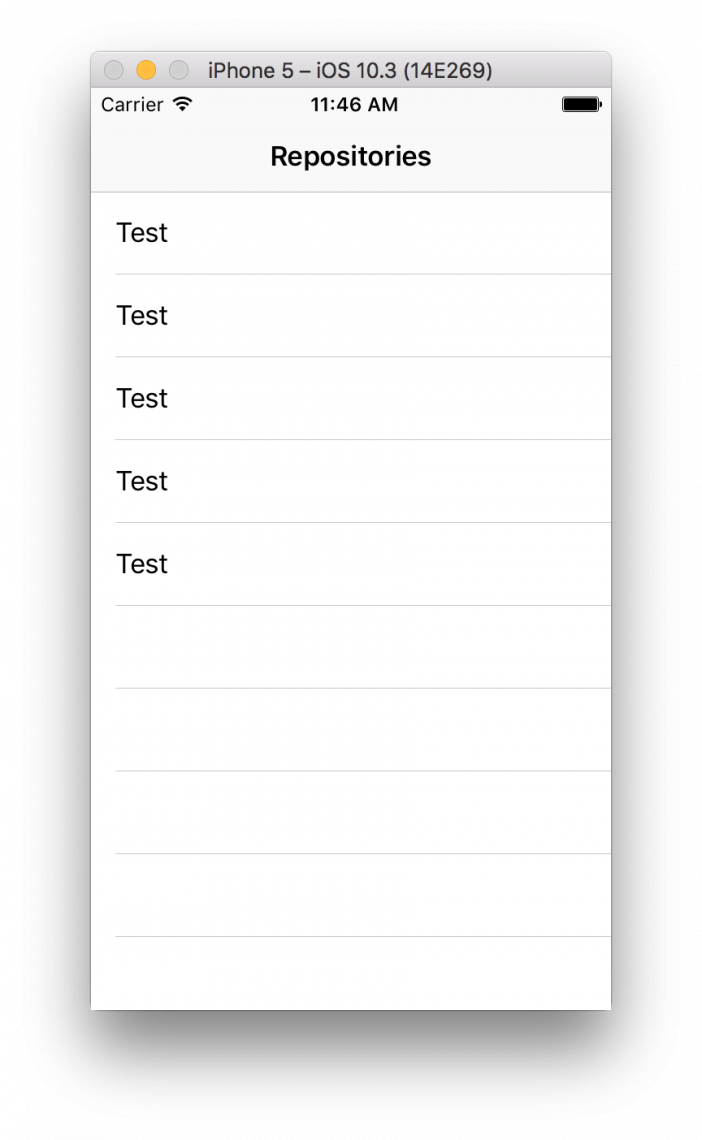
private static final String CELL_IDENTIFIER = "repositoryItemCell";5. Run app normally, before click green arrow select ios in combobox. The app should look like the screen bellow
Fulfill table view with data from GitHub API
1. To start fetching requests from API, we need to do them in background thread. RxJava doesn’t have access to application’s threads. In Android apps we add rxandroid in build.gradle . For iOS app we use MOE port for RxJava. It is available here. Just add this files to project.
2. Next declare NSOperationQueue in RepositoryListViewController.java
private final NSOperationQueue operationQueue;
3. Set NSOperationQueue in constructor
protected RepositoryListViewController(Pointer peer) {
    super(peer);
    operationQueue = NSOperationQueue.alloc().init();
    operationQueue.setQualityOfService(NSQualityOfService.Background);
}
4. Override method viewDidLoad() . Inside then initialize RepositoryPresenter from common module and start fetching repositories.
@Override
public void viewDidLoad() {
    super.viewDidLoad();
    RepositoryPresenter repositoryPresenter = new RepositoryPresenter(this);
    repositoryPresenter.getRepositories(IOSSchedulers.mainThread(), IOSSchedulers.handlerThread(operationQueue));
}
5. To receive data in View Controller use IRepositoryView interface, add them to implemented interfaces by RepositoryViewController and override method.
@Override
public void showRepositories(List<Repository> allRepositories) {
    this.mAllRepositories = allRepositories;
    repositoryTableView().reloadData();
}
6. Declare mAllRepositories
private List<Repository> mAllRepositories = new ArrayList<>();7. Change tableViewCellForRowAtIndexPath and tableViewNumberOfRowsInSection to use mAllRepositories
@Override
public UITableViewCell tableViewCellForRowAtIndexPath(UITableView tableView, NSIndexPath indexPath) {
UITableViewCell cell = (UITableViewCell) tableView.dequeueReusableCellWithIdentifierForIndexPath(CELL_IDENTIFIER, indexPath);
cell.textLabel().setText(mAllRepositories.get((int) indexPath.row()).getName());
return cell;
}
@Override
public long tableViewNumberOfRowsInSection(UITableView tableView, @NInt long section) {
return mAllRepositories.size();
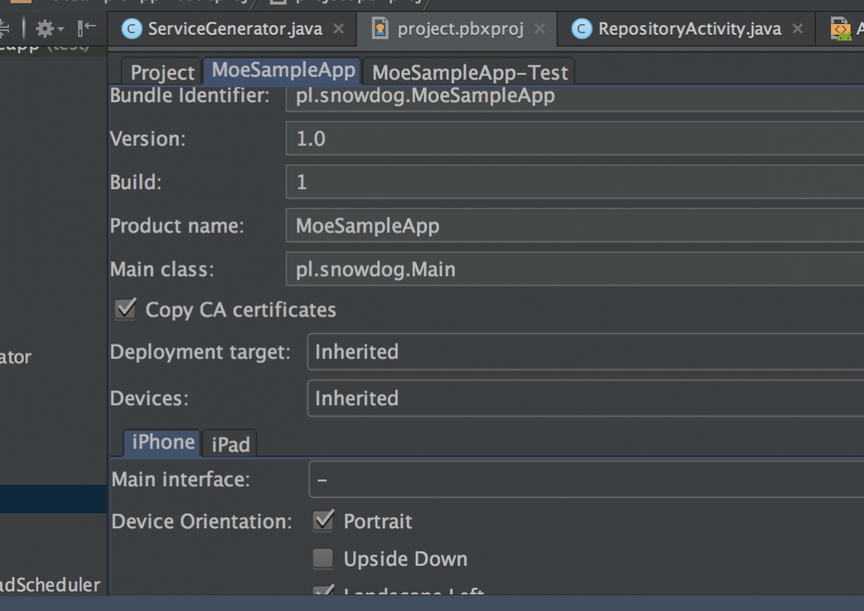
}8. Run application, if list is empty, it is probably caused by Security Exception. You can find this bug using debugger. You should catch them in onError method in getRepositories in common module. To fix them open project.pbxproj file and checked Copy CA certificates
iOS app is finished now.
Create Android Views
The last part of our MOE app is to create Android app.
1. Add to build.gradle dependency:
compile 'com.android.support:recyclerview-v7:25.3.0'2. Next add RecyclerView in activity_repo.xml
<RelativeLayout xmlns:android="http://schemas.android.com/apk/res/android" xmlns:tools="http://schemas.android.com/tools" android:layout_width="match_parent" android:layout_height="match_parent" tools:context="pl.snowdog.moesampleapp.RepositoryActivity">

    <android.support.v7.widget.RecyclerView android:id="@+id/repository_recycler_view" android:layout_width="match_parent" android:layout_height="wrap_content"/>
</RelativeLayout>
3. Create row for Recycler View
<LinearLayout xmlns:android="http://schemas.android.com/apk/res/android" android:layout_width="match_parent" android:layout_height="wrap_content" android:layout_margin="16dp" android:orientation="vertical">

    <TextView android:id="@+id/titleTextView" android:layout_width="match_parent" android:layout_height="match_parent" android:textSize="18sp"/>
</LinearLayout>
4. Next create simple RepositoriesAdapter
public class RepositoriesAdapter extends RecyclerView.Adapter<RepositoriesAdapter.RepositoriesViewHolder> {

    private List<Repository> mRepositoriesList;

    public RepositoriesAdapter(List<Repository> mRepositoriesList) {
        this.mRepositoriesList = mRepositoriesList;
    }

    @Override
    public RepositoriesViewHolder onCreateViewHolder(ViewGroup parent, int viewType) {
        View view = LayoutInflater.from(parent.getContext()).inflate(R.layout.repo_row, parent, false);
        return new RepositoriesViewHolder(view);
    }

    @Override
    public void onBindViewHolder(RepositoriesViewHolder holder, int position) {
        holder.titleTextView.setText(mRepositoriesList.get(position).getName());
    }

    @Override
    public int getItemCount() {
        return mRepositoriesList.size();
    }

    public class RepositoriesViewHolder extends RecyclerView.ViewHolder {
        public TextView titleTextView;
        public RepositoriesViewHolder(View itemView) {
            super(itemView);
            titleTextView = (TextView) itemView.findViewById(R.id.titleTextView);
        }
    }
}
5. In onCreate method set Recycler View and initialize RepositoryPresenter
mRecyclerView = (RecyclerView) findViewById(R.id.repository_recycler_view);
mLayoutManager = new LinearLayoutManager(this);
mRecyclerView.setLayoutManager(mLayoutManager);
DividerItemDecoration dividerItemDecoration = new DividerItemDecoration(mRecyclerView.getContext(),
                LinearLayout.VERTICAL);
mRecyclerView.addItemDecoration(dividerItemDecoration);
RepositoryPresenter repositoryPresenter = new RepositoryPresenter(this);
repositoryPresenter.getRepositories(AndroidSchedulers.mainThread(), Schedulers.newThread());
6. Implement IRepositoryView and override method
  @Override
    public void showRepositories(List<Repository> allRepositories) {
        mAllRepositories = allRepositories;
        mRepositoriesAdapter = new RepositoriesAdapter(mAllRepositories);
        mRecyclerView.setAdapter(mRepositoriesAdapter);
    }
7. In AndroidManifest.xml in activity tag add
android:label="@string/repository_title"8. Set repository_titile in string.xml
<string name="repository_title">Repositories</string>
Android app is finished.
Summary
As you can see code in app and common modules looks like regular Android Application. It’s Model-View-Presenter where app contains View and common contains Model and Presenter. ios module contains View for iOS and it’s most difficult part for Android Developers. We hope that this tutorial will be comprehensive to start with Multi-OS-Engine.
Other external links
1. Multi-OS Engine home page 2. iOS – OperationQueue documentation 3. iOS – UITableView documentation