
Everyone is familiar with Snapchat, and even if you haven't used it yourself, chances are you've heard of it. Personally, I was captivated by the app's navigation system and how intuitive and engaging it felt. While there are already various external libraries available that can replicate this feature, I wanted to provide a comprehensive guide on how to develop Snapchat's navigation from scratch. If you're interested in trying it out for yourself and learning about its inner workings, you've come to the right place.
Horizontal flow
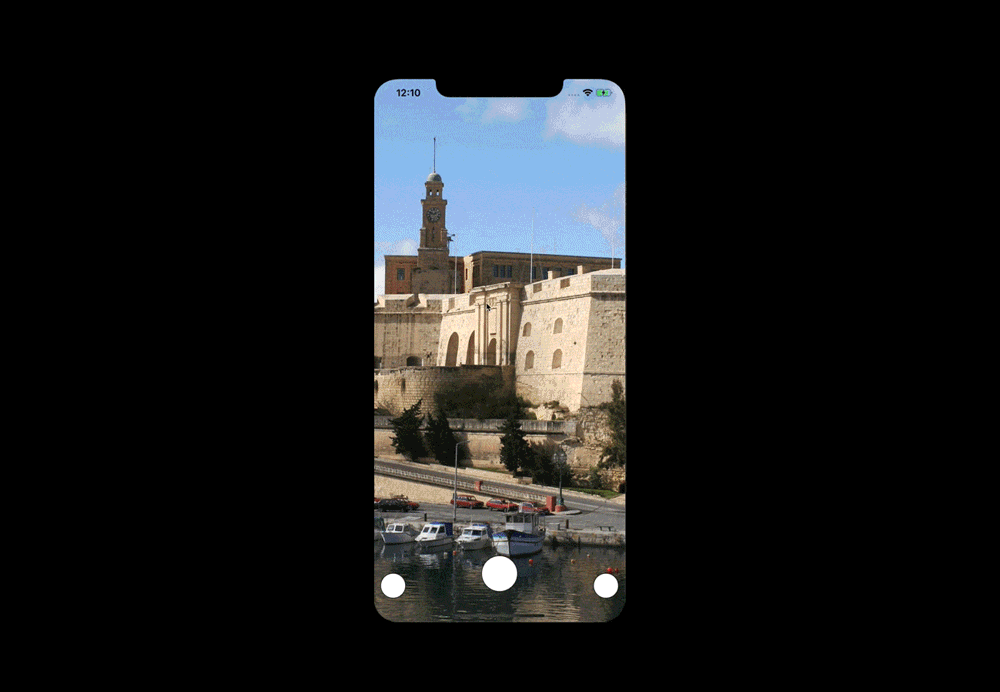
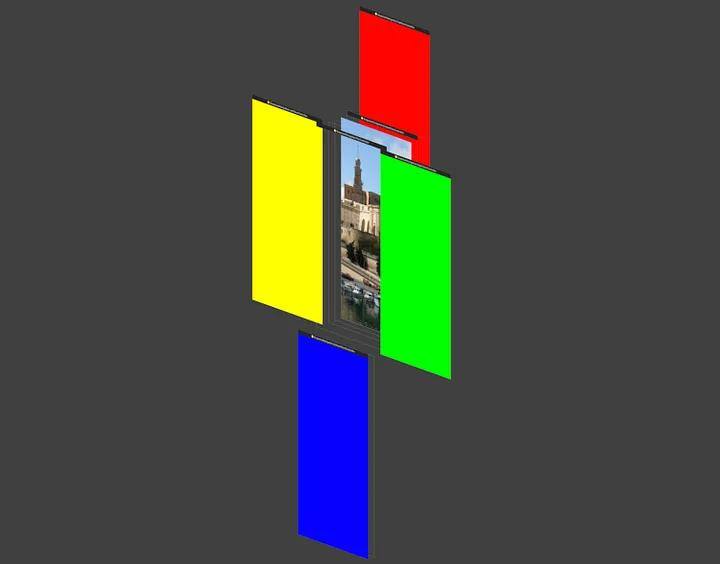
The whole idea for navigating app views is based on gestures. You can go from the central (camera) view, to every other screen by swiping in any direction. In this part we will focus on the horizontal flow axis as a warm up.
You can try achieve this effect with UIPageViewController, but in my opinion that’s a waste of time; in the end one way or another you will need to adopt a delegate of scrollView. It’s like using a sledgehammer to crack a nut.
I decided to add UIScrollView and set needed constraints programmatically (remember to add top and bottom constraints equal to superView, not the safe area, if you don’t want to see blank spaces on iPhone X family screens).
Next up, we want to add view controllers to our scroll view. To keep codebase clean, we can implement this extension with proper factory methods.
  extension UIScrollView {
	//1
    fileprivate static func make() -> UIScrollView {
        let scrollView = UIScrollView()
        scrollView.backgroundColor = .clear
        scrollView.isPagingEnabled = true
        scrollView.bounces = false
        scrollView.showsHorizontalScrollIndicator = false
        scrollView.showsVerticalScrollIndicator = false
        return scrollView
    }

    static func makeHorizontal(with horizontalControllers: [UIViewController], in parent: UIViewController) -> UIScrollView {
        let scrollView = UIScrollView.make()
		//2
        func add(_ child: UIViewController, withOffset offset: CGFloat) {
            parent.addChild(child)
            scrollView.addSubview(child.view)
            child.didMove(toParent: parent)
            child.view.translatesAutoresizingMaskIntoConstraints = false
            NSLayoutConstraint.activate([
                child.view.widthAnchor.constraint(equalTo: scrollView.widthAnchor),
                child.view.heightAnchor.constraint(equalTo: scrollView.heightAnchor),
                child.view.leadingAnchor.constraint(equalTo: scrollView.leadingAnchor, constant: offset)
                ])
        }

		//3
        let width = UIScreen.main.bounds.width
        let height = UIScreen.main.bounds.height

		//4
        for (index, controller) in horizontalControllers.enumerated() {
            let xPosition = CGFloat(index) * width
            add(controller, withOffset: xPosition)
        }

		//5
        scrollView.contentSize = CGSize(width: width * CGFloat(horizontalControllers.count), height: height)
        scrollView.setContentOffset(CGPoint(x: UIScreen.main.bounds.width, y: 0), animated: false)

        return scrollView
    }
}
  // 6
extension UIView {
    func fit(to container: UIView) {
        translatesAutoresizingMaskIntoConstraints = false
        NSLayoutConstraint.activate([
            leadingAnchor.constraint(equalTo: container.leadingAnchor),
            trailingAnchor.constraint(equalTo: container.trailingAnchor),
            topAnchor.constraint(equalTo: container.topAnchor),
            bottomAnchor.constraint(equalTo: container.bottomAnchor)
            ])
    }
}
view raw
What have we done here?
- This part of code models the behavior of scrollView, which we can set it as fileprivate, as we don’t want to make it accessible by every scrollView in the app
- Created internal function for adding view controllers as children
- Set the width and height to fill the whole screen
- Calculated the position on x axis for enumerated view controllers
- Set proper content size and content offset
- Added extension for fitting views into containers
Let’s go back to our main view controller, where you can set snapchat navigation with code:
  class ViewController: UIViewController {
    private var scrollView: UIScrollView!

    override func viewDidLoad() {
        super.viewDidLoad()

        setupUI()
    }

    private func setupUI() {
        let rightPanel = RightViewController()
        let centerPanel = CenterViewController()
        let leftPanel = LeftViewController()

        scrollView = UIScrollView.makeHorizontal(
            with: [leftPanel, centerPanel, rightPanel],
            in: self
        )
        view.addSubview(scrollView)
        scrollView.fit(to: view)
    }

}
Done! Once you have an idea of how it is working, it’s not that hard to implement. You might even be familiar with it thanks to other tutorials, but we need this for the next step, which is a bit more challenging and interesting in my opinion.
Stay tuned for the second part of this tutorial, which will focus on reproducing Snapchat’s vertical navigation.
Read the other parts of this tutorial
- Part 2 — Vertical scrolling
- Part 3 — Adding the details