In recent years, Apple has made significant strides in the realm of machine learning and camera technology, both in terms of hardware and software. Notably, many Apple devices now come equipped with a dedicated neural engine, a specialized processor designed to accelerate machine learning models.
Apple's Advancements in Machine Learning and Camera Capabilities
During WWDC 2020, Apple unveiled several exciting developments. The introduction of iOS 14 brought a plethora of enhancements and intriguing new features to Apple's computer vision framework. Initially released in 2017, the Vision framework empowered developers to harness sophisticated computer vision algorithms effortlessly. In iOS 14, Apple focused on expanding the capabilities of the Vision framework, particularly in the realm of hand tracking and improved body pose estimation for images and videos. Alongside hand and body tracking, the update introduced various other captivating features
- Trajectory Detection: the ability to analyze and detect objects’ trajectories in a given video sequence. With iOS 14 a new Vision request was introduced VNDetectTrajectoriesRequest.
- Contour Detection: VNDetectContoursRequest allows you to identify the contours of shapes in an image. It will come in handy in places where we need to locate specific objects or group them by form or size.
- Optical Flow: VNGenerateOpticalFlowRequest determines directional change for pixels in a given image, useful for motion estimation or surveillance tracking.
Let’s look at how to create a Vision Hand Pose Request in iOS 14.
Vision Hand Pose Estimation
So how do you use Vision for this? To use any algorithm in Vision, you generally follow these three steps:
- The first step is to create a request handler. Here we are using the ImageRequestHandler.
let handler = VNImageRequestHandler(cmSampleBuffer: sampleBuffer, orientation: .up, options: [:])
2. Next, create the request. In this case, use VNDetectHumanHandPoseRequest.
  private let handPoseRequest: VNDetectHumanHandPoseRequest = {
  let request = VNDetectHumanHandPoseRequest()
  request.maximumHandCount = 1
  return request
}()
3. Finally, you get potential results or observations back. These observations are instances of VNObservation based on the request you made.
  extension CameraController: AVCaptureVideoDataOutputSampleBufferDelegate {
  func captureOutput(_ output: AVCaptureOutput, didOutput sampleBuffer: CMSampleBuffer, from connection: AVCaptureConnection) {
    let handler = VNImageRequestHandler(cmSampleBuffer: sampleBuffer, orientation: .up, options: [:])
    do {
      try handler.perform([handPoseRequest])
      guard let observation = handPoseRequest.results?.first else {
        return
      }
    } catch {
      // stop camera running session
    }
  }
}
Vision framework detects hands in a detailed manner
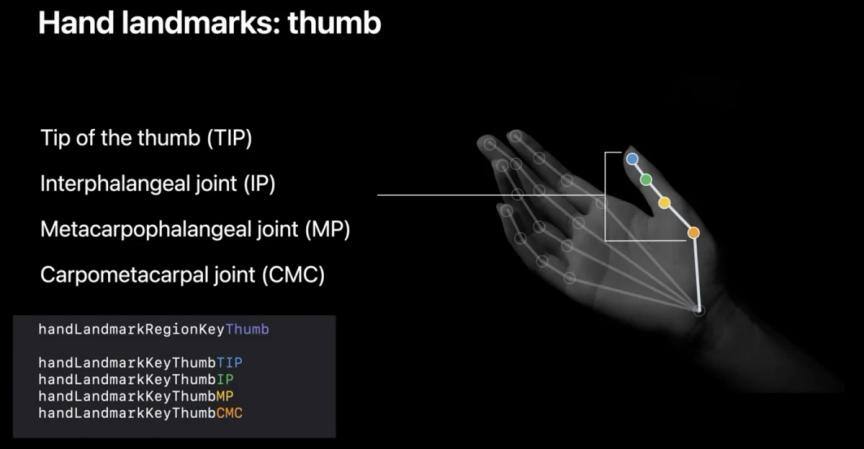
Here I am showing you a quick overview of the hand landmarks that are returned. There are four for each finger and thumb and one for the wrist, for a total of twenty-one hand landmarks. We have a new type called VNRecognizedPointGroupKey. Each of the hand landmarks belong to at least one of VNRecognizedPointGroupKey groups.
If we find a hand, we’ll be getting an observation back and from that observation we can get the thumb points and the index finger points by using their VNRecognizedPointGroupKey by calling recognizedPoints. Using those collections, we can look for the finger points. We ignore any low confidence points and then at the end of this section, we convert the points from Vision coordinates to AVfoundation coordinates.
let thumbPoints = try observation.recognizedPoints(.thumb)
let indexFingerPoints = try observation.recognizedPoints(.indexFinger)
let middleFingerPoints = try observation.recognizedPoints(.middleFinger)
let ringFingerPoints = try observation.recognizedPoints(.ringFinger)
let littleFingerPoints = try observation.recognizedPoints(.littleFinger)
let wristPoints = try observation.recognizedPoints(.all)

// Look for tip points.
guard let thumbTipPoint = thumbPoints[.thumbTip],
      let thumbIpPoint = thumbPoints[.thumbIP],
      let thumbMpPoint = thumbPoints[.thumbMP],
      let thumbCMCPoint = thumbPoints[.thumbCMC] else {
    return
}

guard let indexTipPoint = indexFingerPoints[.indexTip],
      let indexDipPoint = indexFingerPoints[.indexDIP],
      let indexPipPoint = indexFingerPoints[.indexPIP],
      let indexMcpPoint = indexFingerPoints[.indexMCP] else {
    return
}

guard let middleTipPoint = middleFingerPoints[.middleTip],
      let middleDipPoint = middleFingerPoints[.middleDIP],
      let middlePipPoint = middleFingerPoints[.middlePIP],
      let middleMcpPoint = middleFingerPoints[.middleMCP] else {
    return
}

guard let ringTipPoint = ringFingerPoints[.ringTip],
      let ringDipPoint = ringFingerPoints[.ringDIP],
      let ringPipPoint = ringFingerPoints[.ringPIP],
      let ringMcpPoint = ringFingerPoints[.ringMCP] else {
    return
}

guard let littleTipPoint = littleFingerPoints[.littleTip],
      let littleDipPoint = littleFingerPoints[.littleDIP],
      let littlePipPoint = littleFingerPoints[.littlePIP],
      let littleMcpPoint = littleFingerPoints[.littleMCP] else {
    return
}

guard let wristPoint = wristPoints[.wrist] else {
    return
}

let minimumConfidence: Float = 0.3
// Ignore low confidence points.
guard thumbTipPoint.confidence > minimumConfidence,
      thumbIpPoint.confidence > minimumConfidence,
      thumbMpPoint.confidence > minimumConfidence,
      thumbCMCPoint.confidence > minimumConfidence else {
    return
}

guard indexTipPoint.confidence > minimumConfidence,
      indexDipPoint.confidence > minimumConfidence,
      indexPipPoint.confidence > minimumConfidence,
      indexMcpPoint.confidence > minimumConfidence else {
    return
}

guard middleTipPoint.confidence > minimumConfidence,
      middleDipPoint.confidence > minimumConfidence,
      middlePipPoint.confidence > minimumConfidence,
      middleMcpPoint.confidence > minimumConfidence else {
    return
}

guard ringTipPoint.confidence > minimumConfidence,
      ringDipPoint.confidence > minimumConfidence,
      ringPipPoint.confidence > minimumConfidence,
      ringMcpPoint.confidence > minimumConfidence else {
    return
}

guard littleTipPoint.confidence > minimumConfidence,
      littleDipPoint.confidence > minimumConfidence,
      littlePipPoint.confidence > minimumConfidence,
      littleMcpPoint.confidence > minimumConfidence else {
    return
}

guard wristPoint.confidence > minimumConfidence else {
    return
}

// Convert points from Vision coordinates to AVFoundation coordinates.
let thumbTip = CGPoint(x: thumbTipPoint.location.x, y: 1 - thumbTipPoint.location.y)
let thumbIp = CGPoint(x: thumbIpPoint.location.x, y: 1 - thumbIpPoint.location.y)
let thumbMp = CGPoint(x: thumbMpPoint.location.x, y: 1 - thumbMpPoint.location.y)
let thumbCmc = CGPoint(x: thumbCMCPoint.location.x, y: 1 - thumbCMCPoint.location.y)
let indexTip = CGPoint(x: indexTipPoint.location.x, y: 1 - indexTipPoint.location.y)
let indexDip = CGPoint(x: indexDipPoint.location.x, y: 1 - indexDipPoint.location.y)
let indexPip = CGPoint(x: indexPipPoint.location.x, y: 1 - indexPipPoint.location.y)
let indexMcp = CGPoint(x: indexMcpPoint.location.x, y: 1 - indexMcpPoint.location.y)
let middleTip = CGPoint(x: middleTipPoint.location.x, y: 1 - middleTipPoint.location.y)
let middleDip = CGPoint(x: middleDipPoint.location.x, y: 1 - middleDipPoint.location.y)
let middlePip = CGPoint(x: middlePipPoint.location.x, y: 1 - middlePipPoint.location.y)
let middleMcp = CGPoint(x: middleMcpPoint.location.x, y: 1 - middleMcpPoint.location.y)
let ringTip = CGPoint(x: ringTipPoint.location.x, y: 1 - ringTipPoint.location.y)
let ringDip = CGPoint(x: ringDipPoint.location.x, y: 1 - ringDipPoint.location.y)
let ringPip = CGPoint(x: ringPipPoint.location.x, y: 1 - ringPipPoint.location.y)
let ringMcp = CGPoint(x: ringMcpPoint.location.x, y: 1 - ringMcpPoint.location.y)
let littleTip = CGPoint(x: littleTipPoint.location.x, y: 1 - littleTipPoint.location.y)
let littleDip = CGPoint(x: littleDipPoint.location.x, y: 1 - littleDipPoint.location.y)
let littlePip = CGPoint(x: littlePipPoint.location.x, y: 1 - littlePipPoint.location.y)
let littleMcp = CGPoint(x: littleMcpPoint.location.x, y: 1 - littleMcpPoint.location.y)
let wrist = CGPoint(x: wristPoint.location.x, y: 1 - wristPoint.location.y)
So let’s go into processPoints.
  func processPoints(_ fingers: [CGPoint]) {
  // 1
  let convertedPoints = fingers.map {
    cameraView.previewLayer.layerPointConverted(fromCaptureDevicePoint: $0)
  }

  // 2
  pointsProcessorHandler?(convertedPoints)
}
- Convert from AVFoundation relative coordinates to UIKit coordinates so you can draw them on screen
- You call the closure with the converted points.
Displaying Fingertips
pointsProcessorHandler is going to get your detected fingerprints on the screen. You can pass those values to your SwiftUI view and display them on your camera overlay.
  @State private var overlayPoints: [CGPoint] = []

var body: some View {
    CameraView {
      overlayPoints = $0
    }
    .overlay(
      FingersOverlay(with: overlayPoints)
        .foregroundColor(.red)
    )
}
Summary
In this tutorial, as you can see, it is so easy to take advantage of all the new API’s in Vision to perform hand recognition. Here, I showed you how easy it is to detect individual fingers on your hand. You can develop your project in a more advanced way, for example, by detecting the junction of the thumb with the index finger and then draw on the screen of your iPhone without touching it. It is also possible to drag items on the screen of the selected device. Now a question for you: how should the hand be placed to do something like this? 😀 You can also use all the points on the hand and thus control a robot arm remotely. Which seems really interesting. As you can see, the possibilities are endless.
Below you can see video from our sample project with using hand recognition.

