With the new Palette library and Material design, we’re able to create more color-aware applications, implementing color adaptable user interfaces.
TL;DR There’s a link to the ColorizeToolbarHelper class at the end of the article. It works out of the box.
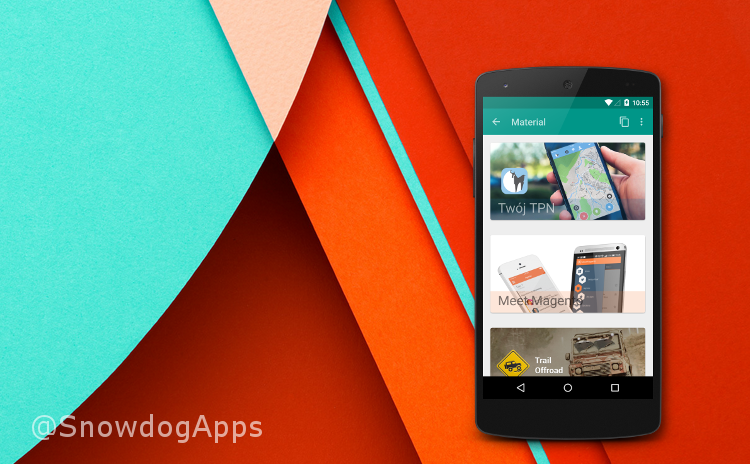
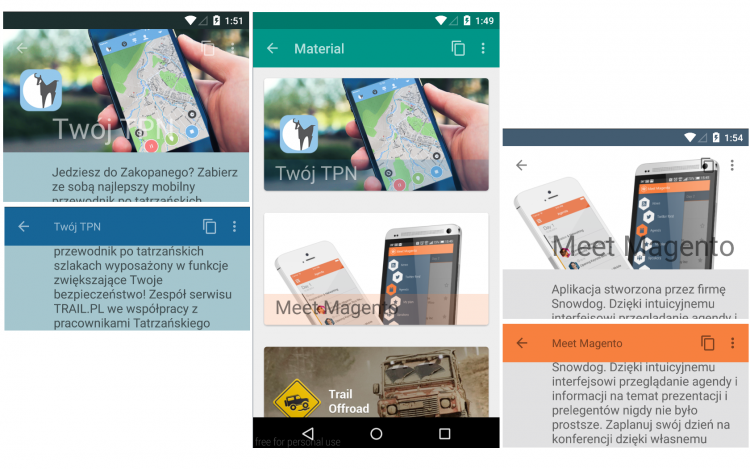
Instead of using the same colors across the app, we’re can easily colorize the views, using leading colors of on screen visible pictures. Here are examples of few views already colorized according to the leading image palette.
Todays article is focused on dynamic colorizing of Toolbar views (icons and textviews), so they fit the color scheme choosen by palette algorithms (Please follow this link to find out how to use Palette library). As achieving this with use of Themes may turn impossible, we took different approach, where each toolbars child-view is colorized with ColorFilter. It’s achieved in 4 steps:
- Changing the color of back button (or open drawer button).
- Changing the color of any ActionMenuViews – icons that are not back button, nor text, nor overflow menu icon.
- Changing the color of title and subtitle.
- Changing the color of the Overflow Menu icon.
The following code is based on Compatibility libraries (Appcompat, and Palette) so it will work not only on Lollipop, but on all Android devices (as regular Appcompat based apps).
Let’s color it up!
To get all Toolbar views, we iterate through all it’s child views and colorize them separately. The loop code for it looks like this:
  /** * Use this method to colorize toolbar icons to the desired target color * @param toolbarView toolbar view being colored * @param toolbarIconsColor the target color of toolbar icons * @param activity reference to activity needed to register observers */
public static void colorizeToolbar(Toolbar toolbarView, int toolbarIconsColor, Activity activity) {
    final PorterDuffColorFilter colorFilter
            = new PorterDuffColorFilter(toolbarIconsColor, PorterDuff.Mode.MULTIPLY);

    for(int i = 0; i < toolbarView.getChildCount(); i++) {
        final View v = toolbarView.getChildAt(i);

        //Step 1 : Changing the color of back button (or open drawer button).
        if(v instanceof ImageButton) {
            //Action Bar back button
            ((ImageButton)v).getDrawable().setColorFilter(colorFilter);
        }

        if(v instanceof ActionMenuView) {
            for(int j = 0; j < ((ActionMenuView)v).getChildCount(); j++) {

                //Step 2: Changing the color of any ActionMenuViews - icons that
                //are not back button, nor text, nor overflow menu icon.
                final View innerView = ((ActionMenuView)v).getChildAt(j);

                if(innerView instanceof ActionMenuItemView) {
                    int drawablesCount = ((ActionMenuItemView)innerView).getCompoundDrawables().length;
                    for(int k = 0; k < drawablesCount; k++) {
                        if(((ActionMenuItemView)innerView).getCompoundDrawables()[k] != null) {
                            final int finalK = k;

                            //Important to set the color filter in seperate thread,
                            //by adding it to the message queue
                            //Won't work otherwise.
                            innerView.post(new Runnable() {
                                @Override
                                public void run() {
                                    ((ActionMenuItemView) innerView).getCompoundDrawables()[finalK].setColorFilter(colorFilter);
                                }
                            });
                        }
                    }
                }
            }
        }

        //Step 3: Changing the color of title and subtitle.
        toolbarView.setTitleTextColor(toolbarIconsColor);
        toolbarView.setSubtitleTextColor(toolbarIconsColor);

        //Step 4: Changing the color of the Overflow Menu icon.
        setOverflowButtonColor(activity, colorFilter);
    }
}
The above code is pretty self explanatory, however to have it working, we need extra steps to colorize the overflow menu icon.
The Overflow Menu Icon
The following solution is taken from the StackOverflow thread : http://stackoverflow.com/questions/22046903/changing-the-android-overflow-menu-icon-programmatically/22106474#22106474 We reprint it here to have the whole working toolbar colorization feature at hand.
First we need to add the content description attribute to the overflow menu icon in styles.xml file. It can be any string, it’s just needed to find the proper view later in code by it’s description.
  <!-- Base application theme. -->
<style name="AppTheme" parent="Theme.MyTheme"> <!-- Customize your theme here. --> <item name="android:actionOverflowButtonStyle">@style/Widget.ActionButton.Overflow</item> </style>

<style name="Widget.ActionButton.Overflow" parent="@android:style/Widget.Holo.ActionButton.Overflow"> <item name="android:contentDescription">@string/accessibility_overflow</item> </style>
Second, we implement the method responsible for finding and colorizing the Overflow Icon:
  /** * It's important to set overflowDescription atribute in styles, so we can grab the reference * to the overflow icon. Check: res/values/styles.xml * @param activity * @param colorFilter */
private static void setOverflowButtonColor(final Activity activity, final PorterDuffColorFilter colorFilter) {
    final String overflowDescription = activity.getString(R.string.abc_action_menu_overflow_description);
    final ViewGroup decorView = (ViewGroup) activity.getWindow().getDecorView();
    final ViewTreeObserver viewTreeObserver = decorView.getViewTreeObserver();
    viewTreeObserver.addOnGlobalLayoutListener(new ViewTreeObserver.OnGlobalLayoutListener() {
        @Override
        public void onGlobalLayout() {
            final ArrayList<View> outViews = new ArrayList<View>();
            decorView.findViewsWithText(outViews, overflowDescription,
                    View.FIND_VIEWS_WITH_CONTENT_DESCRIPTION);
            if (outViews.isEmpty()) {
                return;
            }
            TintImageView overflow=(TintImageView) outViews.get(0);
            overflow.setColorFilter(colorFilter);
            removeOnGlobalLayoutListener(decorView,this);
        }
    });
}
Third, we remove the global layout listeners, as they’re no longer needed.
  private static void removeOnGlobalLayoutListener(View v, ViewTreeObserver.OnGlobalLayoutListener listener) {
    if (Build.VERSION.SDK_INT < Build.VERSION_CODES.JELLY_BEAN) {
        v.getViewTreeObserver().removeGlobalOnLayoutListener(listener);
    }
    else {
        v.getViewTreeObserver().removeOnGlobalLayoutListener(listener);
    }
}
And voilà, the Toolbar icons have they’re unique new colors! :)
Toolbar background color
Just for the reference, to change the background color of a toolbar, we simply use the setBackgroundColor method on the reference to Toolbar object:
mToolbarView.setBackgroundColor(color);
Full source code
Here’s a helper class that does all the job for you : ToolbarColorizeHelper on Gist Just call in the fragments onResume method:
ToolbarColorizeHelper.colorizeToolbar(mToolbarView, mToolbarIconsColor, getActivity());
In the next episode, we will show you how to create header parallax effects. Stay tuned for more!